Figma Collaboration Made Simple | The 2025 Guide to Team Design

Ever worked on a group project where everyone's working on different versions of the same file? One person emails "Final_Project.fig," another shares "Final_Project_v2.fig," and by the end, you have "Final_Project_ACTUAL_FINAL.fig" cluttering your downloads folder. Sound familiar? That's the old way of working, and it's incredibly frustrating.
Figma changes everything. Imagine working on the same design file with your friends or teammates where everyone sees changes instantly—no downloading, no emailing files, no confusion about which version is the latest. Whether you're working on a college assignment, building a startup idea with friends, or just learning design, understanding Figma's collaboration features will save you countless hours and headaches. Let's explore how Figma makes teamwork actually enjoyable.
If you've used Photoshop, Illustrator, or even Canva, you know the typical workflow: work on your computer, save the file, then share it somehow. Figma works completely differently—it's cloud-based, meaning everything lives online and multiple people can work together at the same time.
Think of it like Google Docs, but for design. Just like you and your classmates can edit a Google Doc simultaneously for a group presentation, you can all design together in Figma. No more "Can you send me the latest file?" messages at midnight before the deadline.
Here's why this matters: According to industry data, 84% of designers now work collaboratively with others at least weekly. Learning these collaboration skills now—while you're still a student—gives you a massive advantage. These are the exact skills companies look for when hiring designers.
Setting Up: Understanding Figma's Workspace
Before you start collaborating, let's understand how Figma organizes everything. When you create a Figma account (it's free for students!), you get your own workspace.
How Files and Projects Work
Projects are like folders on your computer. You might create projects for:
"College Assignments" (all your class projects)
"Personal Portfolio" (your design portfolio pieces)
"Hackathon Project" (that weekend project with friends)
"Club Website" (design work for your college club)
Files live inside projects. Each file is where the actual design work happens. A file might be "Mobile App Design," "Website Mockup," or "Logo Ideas."
Pages exist within files and help you organize different parts of your design. For example, in a mobile app file, you might have pages for "Wireframes," "Final Designs," and "Design System."
Inviting People to Collaborate
To collaborate with others, you need to invite them to your file. Here's how:
Open your Figma file
Click the blue "Share" button in the top-right corner
Type their email address or copy the link
Choose their permission level:
Can view: They can see your design and leave comments, but can't edit
Can edit: They can make changes to the design (perfect for teammates)
For most group projects, you'll give your teammates "Can edit" access so everyone can contribute.
Real-Time Collaboration: Seeing Each Other Work Live
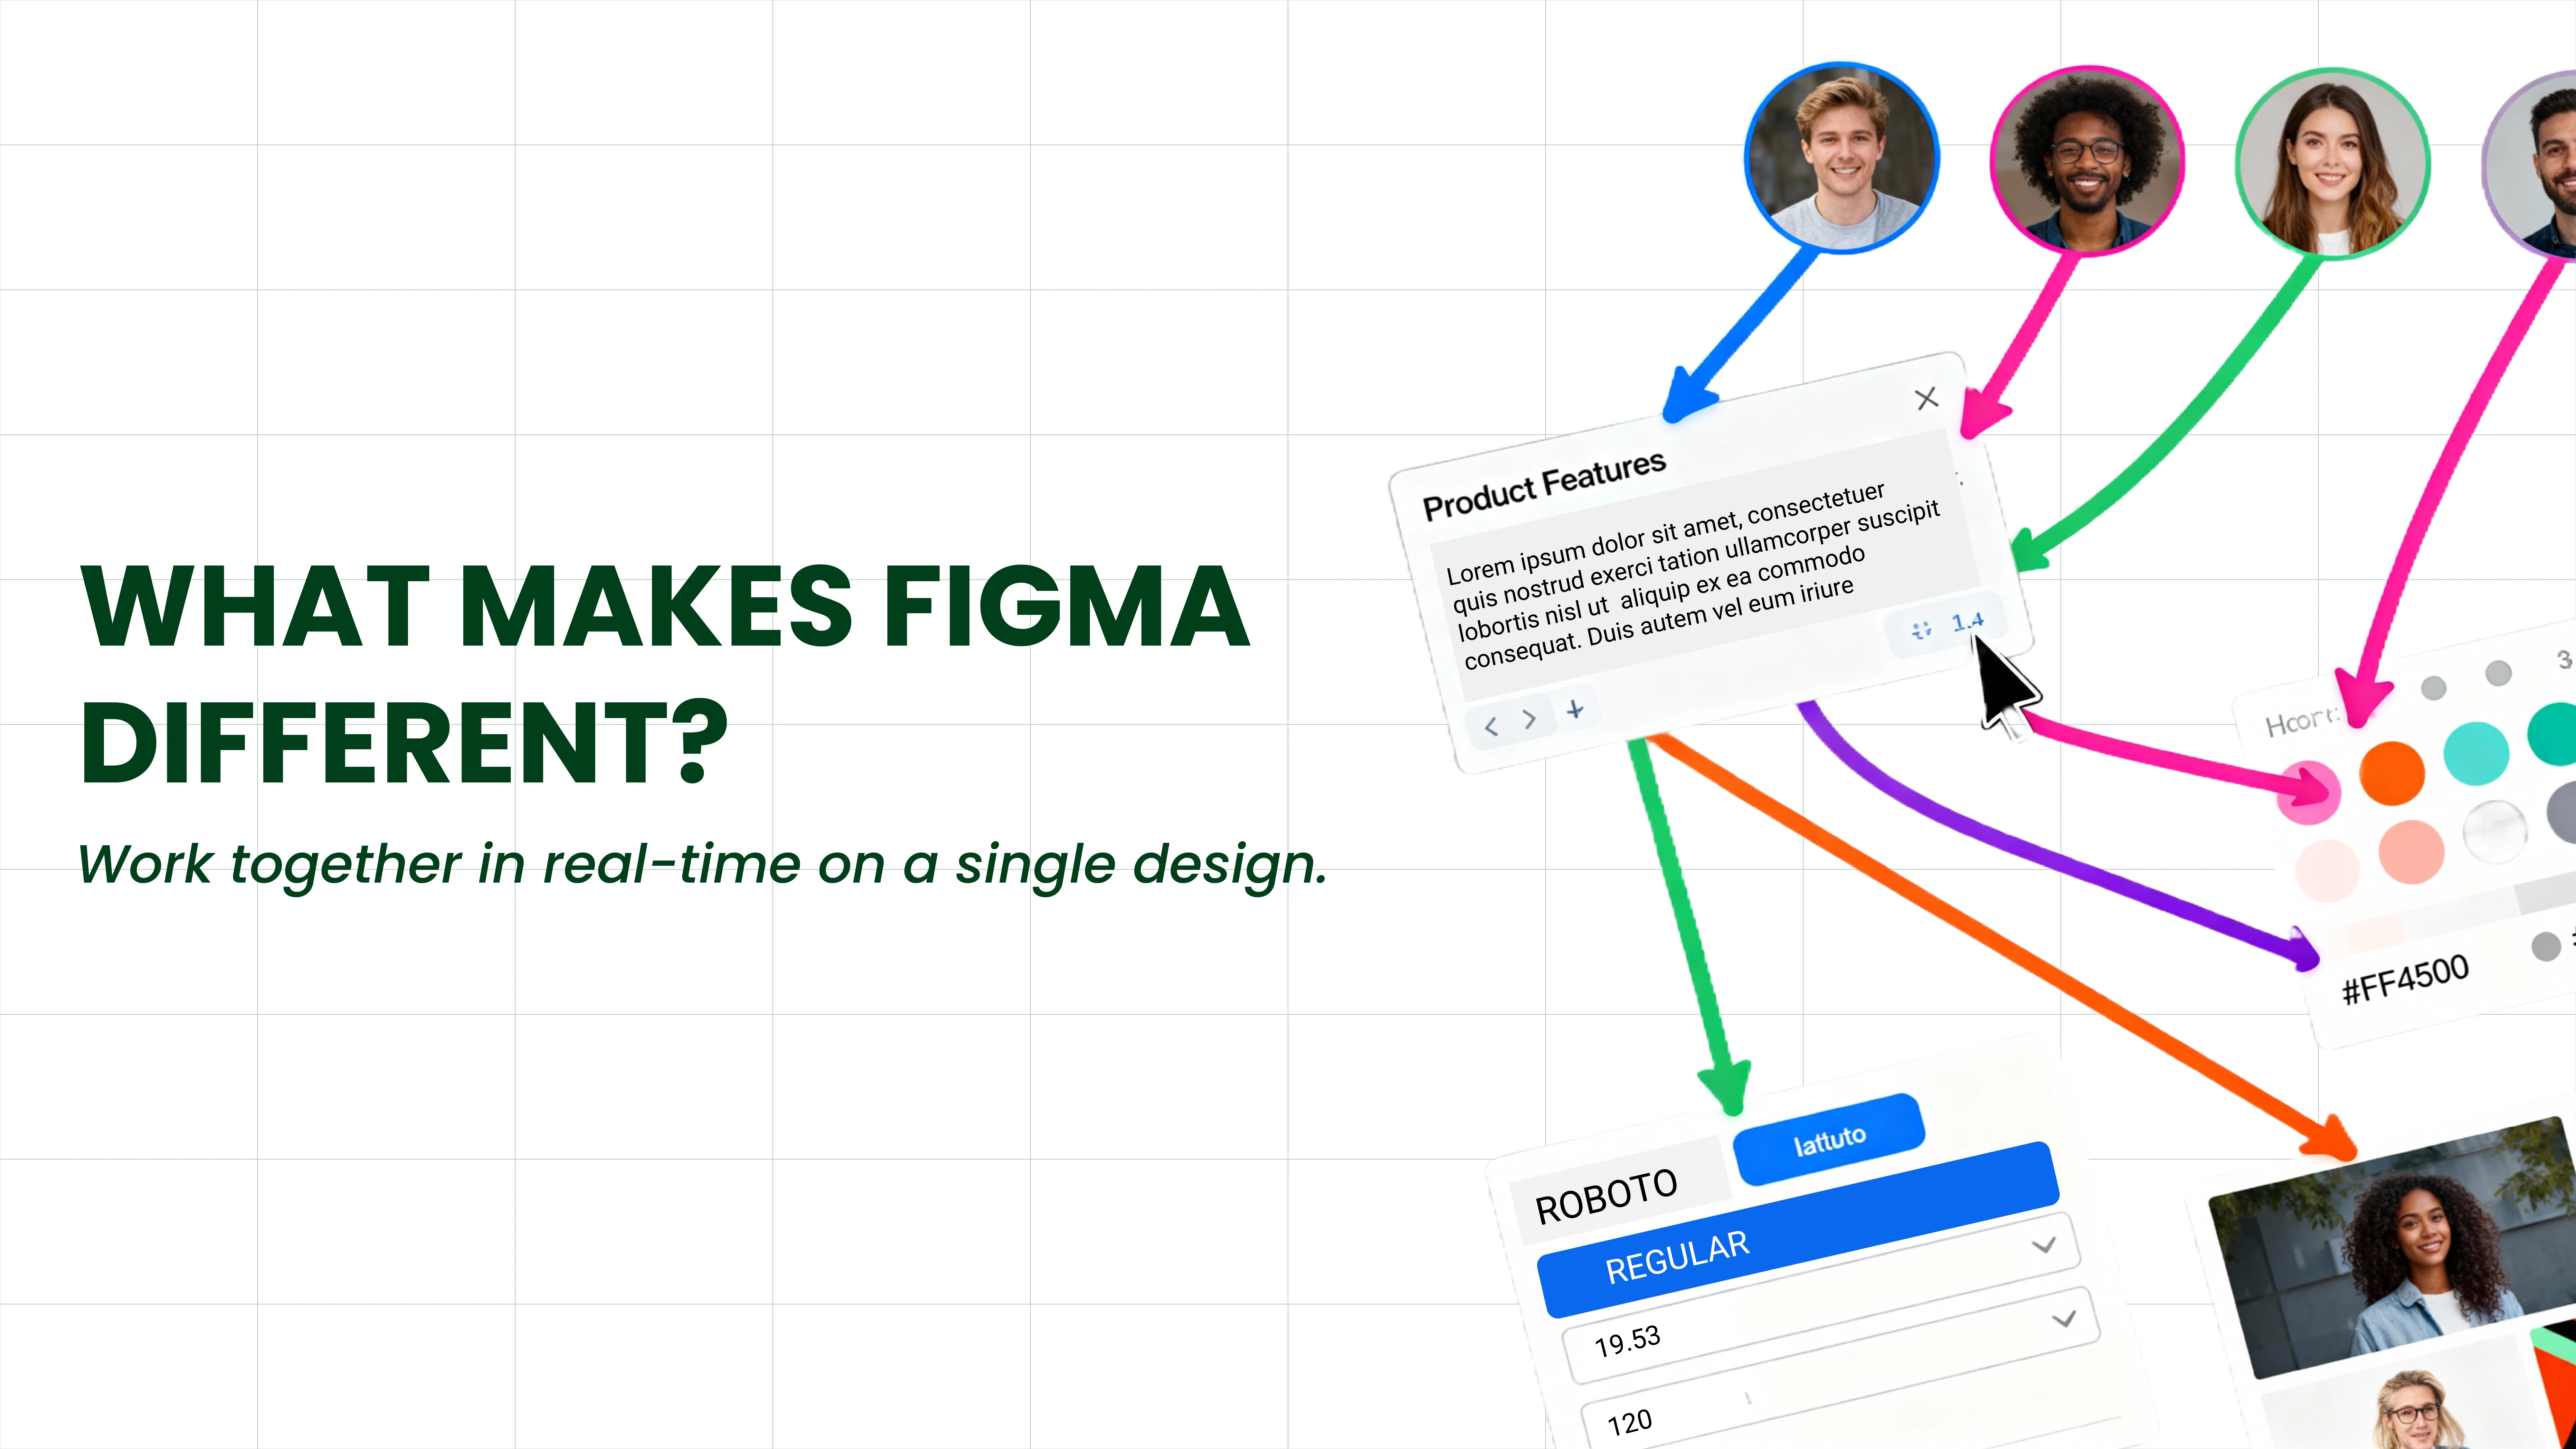
This is where Figma gets really cool. When multiple people open the same file, you'll see everyone's cursor moving around in real-time. It's like being in the same room working on a whiteboard together, except you can all be in different cities or even different countries.
Understanding the Colored Cursors
When you open a file, look at the top-right corner. You'll see small colored circles with names or profile pictures—these are everyone currently in the file. Each person gets a unique color, and their cursor shows their name as they move around.
Example scenario: You're designing a food delivery app with two friends.
You (blue cursor) are working on the home screen with restaurant listings
Your friend Priya (purple cursor) is designing the checkout page
Your friend Rahul (green cursor) is creating icons for the navigation bar
You can all see each other working simultaneously. When Priya finishes the checkout button, you immediately see it appear. When Rahul creates a new icon, it's instantly visible to everyone. No waiting, no file transfers, no confusion.
Following Someone's Screen
Want to see what your teammate is working on? Click on their colored avatar at the top, and your screen will automatically follow wherever they go in the file. This is incredibly useful when:
Someone wants to show you what they're working on
You're having a design review together
Your friend is teaching you a new Figma technique
You're presenting your work to your group
To stop following, just press the Escape key or click anywhere on the canvas.
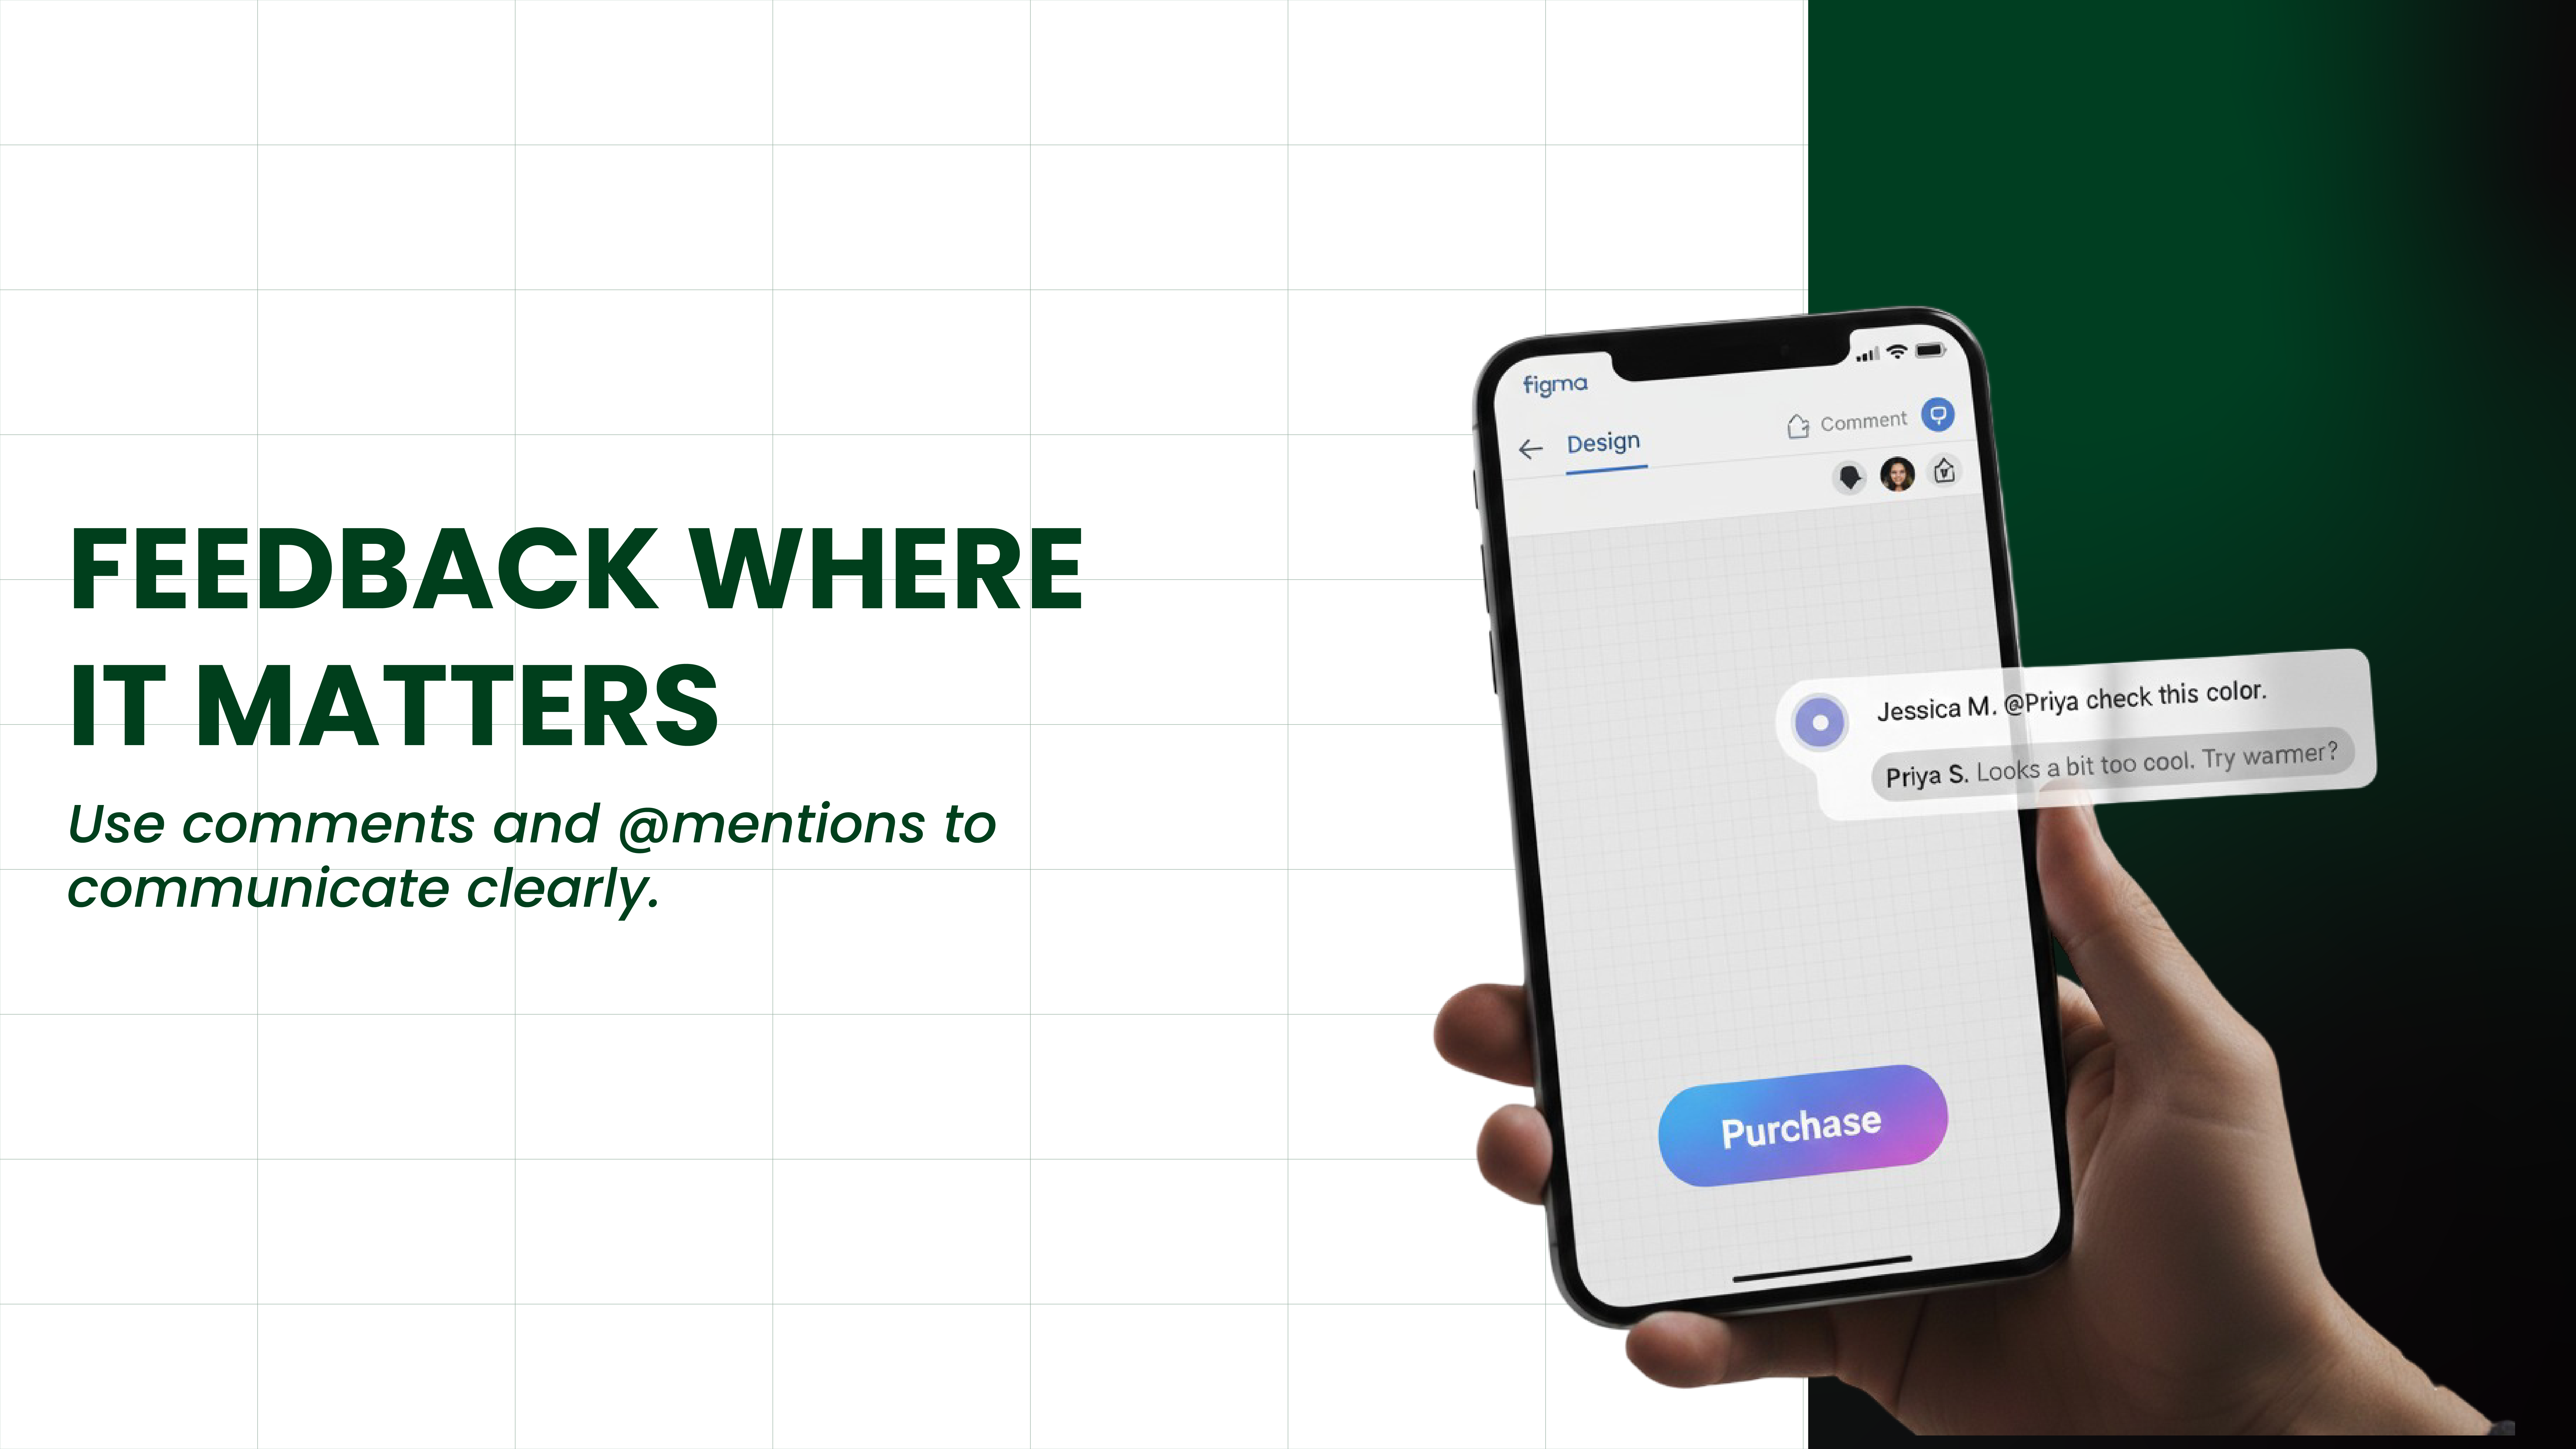
Commenting: Your Digital Sticky Notes
Instead of texting your teammates "Hey, I think the button should be bigger" or trying to explain something over a phone call, you can leave comments directly on the design.
How to Add Comments
Press C on your keyboard (or click the comment bubble icon in the toolbar)
Click anywhere on your design where you want to comment
Type your message
Press "Post" or hit Enter
Your comment appears as a small pin on the design. Anyone who opens the file can see it, read it, and reply.
Using @ Mentions
To make sure someone sees your comment, use @ mentions. Type @ followed by their name:
"@Priya Can you check if this color matches our brand palette?"
They'll get a notification and can respond directly in the comment thread.
Organizing Comments
Resolve comments when they're addressed. After making the changes someone suggested, click the "Resolve" button on the comment. This marks it as complete and hides it from view (but you can always see resolved comments if needed).
This keeps your design clean and makes it easy to see what still needs attention versus what's already been handled.
Design Systems: Your Reusable Component Library
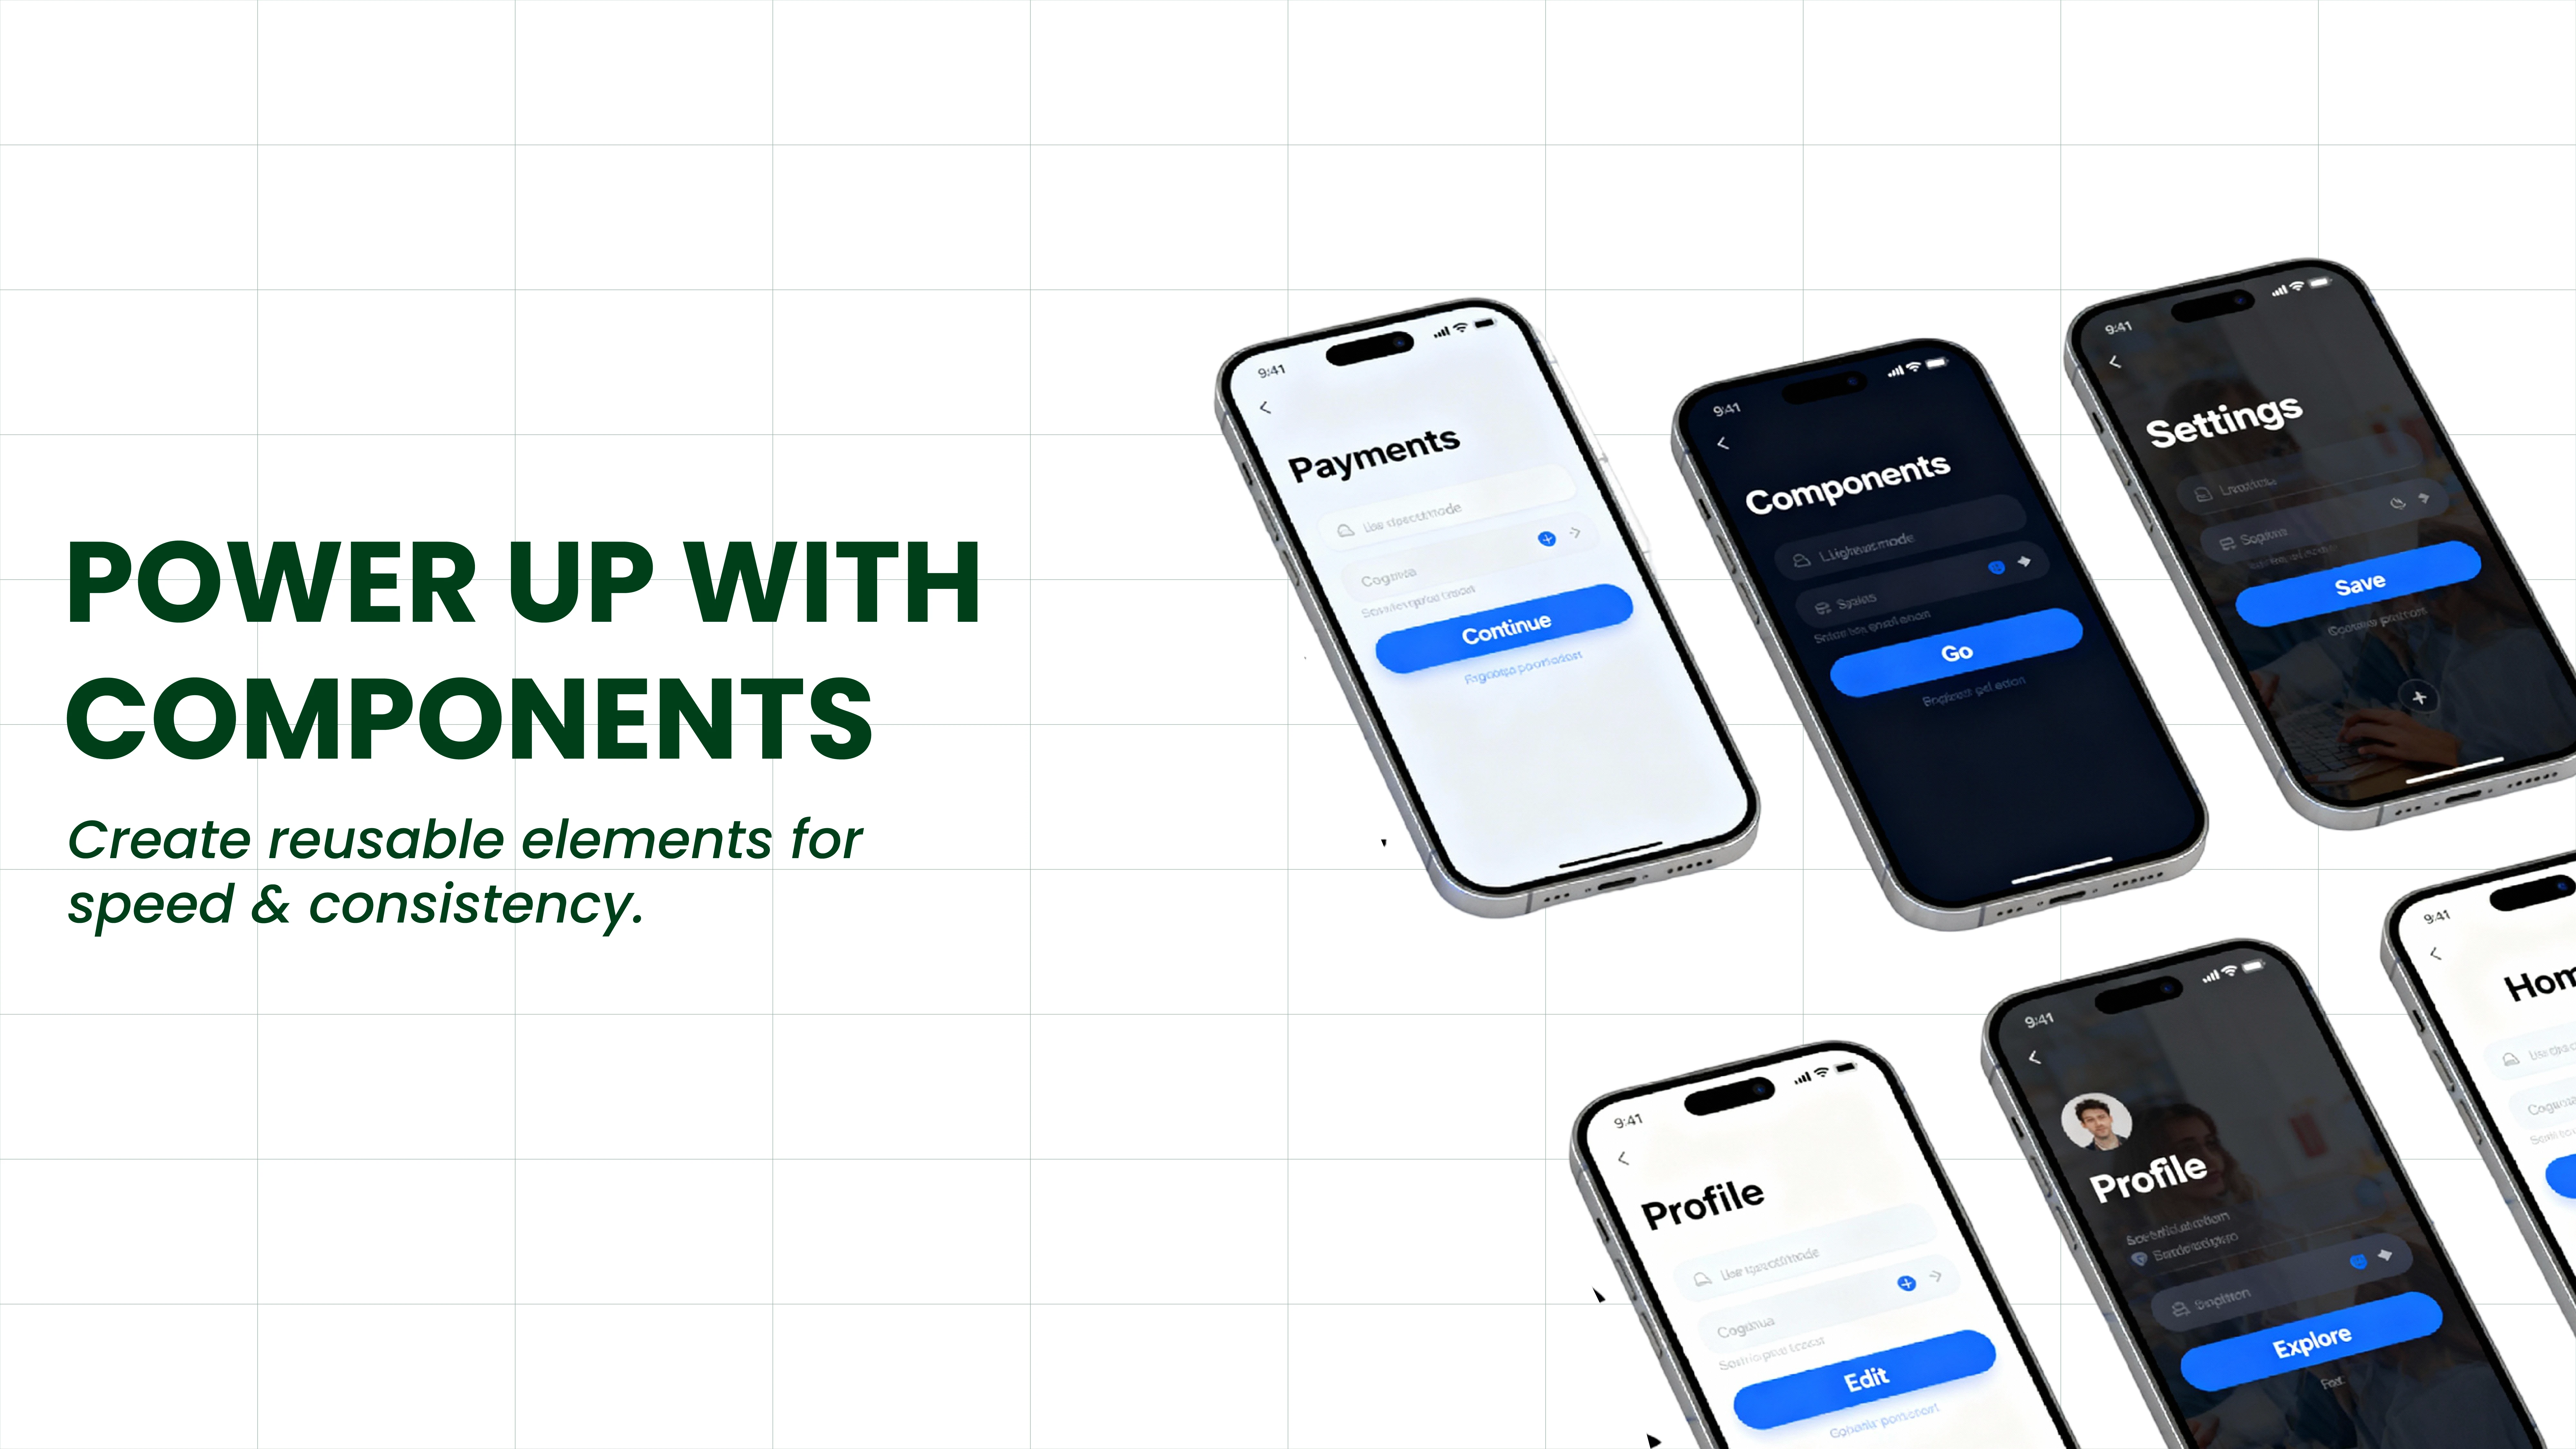
Here's a secret that professional designers know: you don't create every button, form, or icon from scratch for every project. Instead, you create reusable components once and use them everywhere.
What Are Components?
Think of components like templates or stickers. You design a button once with the perfect size, color, and style. Then, whenever you need a button, you just drag in that component instead of redesigning it from scratch.
Benefits of using components:
Consistency: All your buttons look the same
Speed: No need to recreate things repeatedly
Easy updates: Change the main component, and all instances update automatically
Creating Your First Component
Let's say you're designing a mobile app and need buttons throughout:
Design your button (rectangle + text + styling)
Select all the layers that make up your button
Press Ctrl+Alt+K (Windows) or Cmd+Option+K (Mac)
Name it "Primary Button"
Now you have a component! You can find it in the Assets panel (left sidebar) and drag it into your designs whenever needed.
Using Component Variants
Variants let you create different versions of the same component. For example, your button might have:
Default state (normal appearance)
Hover state (when mouse hovers over it)
Pressed state (when clicked)
Disabled state (when it can't be clicked)
Instead of creating four separate buttons, you create one component with four variants. This keeps things organized and makes your file much cleaner.
Working with Developers: Design to Code
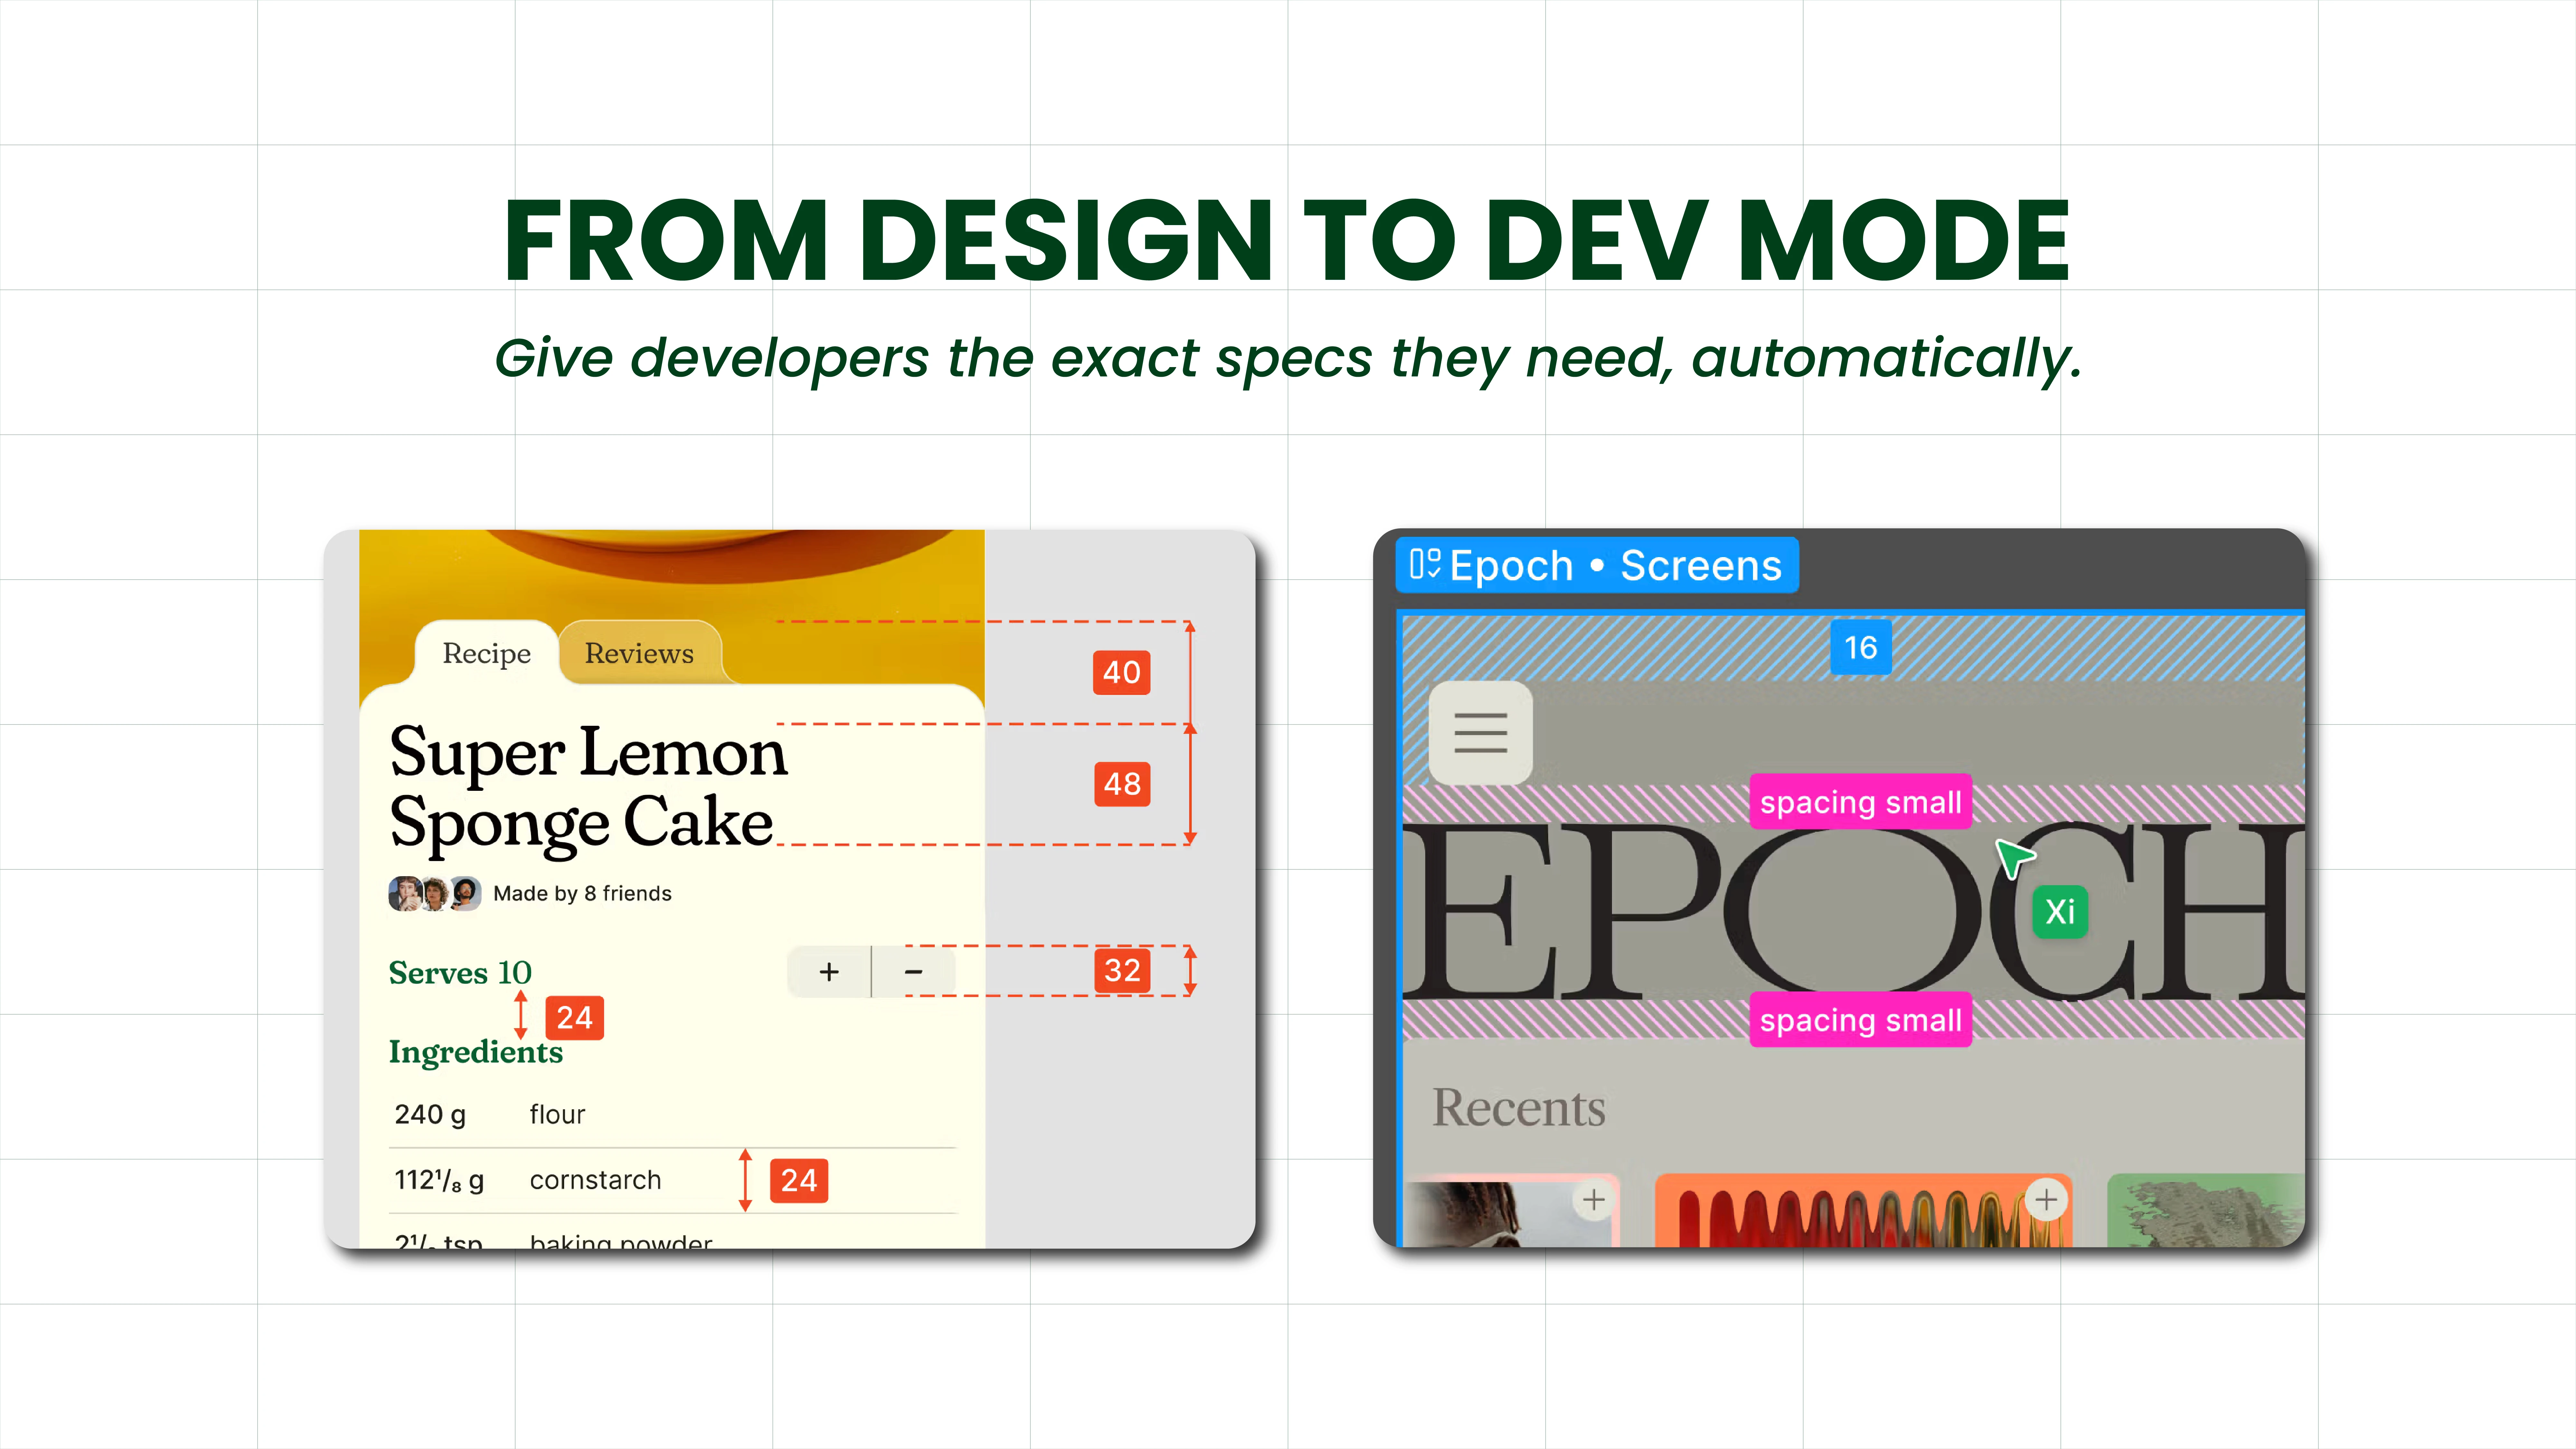
If you're building an actual website or app (not just designing it), you'll need someone to code it. Figma makes the designer-to-developer handoff super smooth with Dev Mode.
What Is Dev Mode?
Dev Mode is a special view that gives developers all the technical information they need to turn your designs into real code. When a developer opens your file and switches to Dev Mode, they can see:
Exact measurements and spacing
Color codes (hex values, RGB)
Font names and sizes
CSS code snippets they can copy
As a designer, you don't need to do anything special. Just design normally, and Dev Mode automatically provides all this information to developers.
Simple Handoff Process
Here's how it typically works:
You finish your design and tell your developer friend it's ready
They open the file and switch to Dev Mode
They inspect elements by clicking on them to see measurements and properties
They might leave comments asking questions like "What happens when someone clicks this?"
You answer their questions through Figma comments
They build it using the specifications from Dev Mode
This beats the old way of taking screenshots, writing specification documents, or trying to explain measurements over messaging apps.
AI-Powered Features: Your Design Assistant
In 2025, Figma includes AI tools that can help you work faster. Think of them as helpful assistants that handle boring tasks so you can focus on creativity.
Figma Make: Turn Ideas Into Designs
Figma Make is like having a design assistant. You describe what you want in plain English, and it creates an initial design that you can then customize.
Example: You type: "Create a dark mode login page with email, password, and a login button"
Figma generates a complete layout with:
A dark background
Input fields for email and password
A styled login button
Proper spacing and alignment
You then customize it—change colors to match your brand, adjust spacing, add your logo, etc. It gives you a starting point instead of staring at a blank canvas wondering where to begin.
Perfect for: Rapid prototyping, exploring ideas quickly, getting past creative blocks, learning layout patterns
First Draft: Generate Realistic Text Content
Tired of using "Lorem ipsum dolor sit amet" placeholder text? First Draft generates actual realistic content based on context.
Example: If you're designing a recipe app and need text for a recipe card, instead of lorem ipsum, First Draft might generate: "Preheat oven to 350°F. Mix flour, sugar, and eggs in a large bowl until smooth..."
This makes your designs look more realistic during presentations and helps you understand if your layout actually works with real content (not just placeholder text that happens to fit perfectly).
Visual Search: Find Similar Designs
Ever thought "I know I designed something like this before, but where is it?"
Visual search lets you upload a screenshot or describe what you're looking for, and Figma AI searches through your files to find similar designs. This is helpful when:
You want to reuse a design pattern you created before
You're looking for that button style you made last month
You need to find all instances of a specific layout
Best Practices for Effective Collaboration
Keep Your Files Organized
Use clear naming conventions:
Bad: "Frame 1", "Rectangle 47", "Group 3"
Good: "Header Section", "Login Button", "Profile Icon"
Organize with pages: Don't cram everything onto one page. Create separate pages for:
Wireframes (rough sketches)
Final designs (polished version)
Components (reusable elements)
Archive (old ideas you're not using)
Common Mistakes to Avoid
Don't ignore the design system: If your team has established components (buttons, colors, fonts), use them. Don't create your own versions; it creates inconsistency.
Don't work in isolation: Share your work-in-progress early. It's better to get feedback when it's easy to change things rather than after you've spent hours on something.
Don't forget to rename layers: Those default names like "Rectangle 47" make it impossible for teammates to understand your file structure.
Don't skip commenting: When someone asks you to change something and you do it, leave a quick comment saying "Done!" so they know it's addressed.
Don't be afraid to ask questions: If you're confused about something, ask. Every designer started as a beginner.
Collaboration Tips for Student Projects
For Group College Assignments
Set up properly at the start:
Create one shared Figma file
Give everyone "Can edit" access
Assign different pages or sections to different people
Agree on a component library (buttons, colors, fonts) before starting
Communication is key:
Use comments instead of external messages when discussing design
Hold quick sync meetings where everyone shares their screen
Use observation mode to review each other's work together
Before submission:
Create a "Final" page with only the polished work
Remove or archive experimental/rough work
Export as PDF or images as required by your professor
For Hackathons and Weekend Projects
Move fast with Figma Make: Use AI to generate initial layouts quickly, then customize them for your specific idea
Use templates: Figma Community has thousands of free templates. Don't start from zero when you're racing against time.
Prototype quickly: Use Figma's prototype mode to make your designs clickable. This impresses judges and helps test your user flows.
Share links: Instead of sending files, share Figma links with judges or mentors so they can view your work directly
For Personal Portfolio Projects
Document your process: Use pages to show:
Initial sketches and ideas
Multiple iterations
Final polished design
Rationale behind decisions
Make it shareable: Keep a portfolio-ready Figma file with your best work that you can share with recruiters or during job applications
Get feedback: Share view-only links with other designers and ask for critique through comments
Conclusion
Figma collaboration isn't complicated; it's actually designed to be intuitive and enjoyable. The best way to learn is by doing. Start a small project with friends, experiment with the features we've discussed, and don't worry about making mistakes. Every professional designer started exactly where you are now.
The collaboration skills you build today will serve you throughout your career, whether you become a professional designer, a developer who works with designers, a product manager, or an entrepreneur building your own products. Understanding how to work effectively with others using modern tools like Figma is a superpower in today's remote-first, digital world.
Remember: design is a team sport. The sooner you embrace collaboration, the better your designs will become.
Want to dive deeper into Figma and learn professional design workflows? Check out Sierra Learning's courses at sierralearning.in, designed specifically for students who want to build industry-ready skills through hands-on projects.


